


In this chapter, you have been thinking about solutions that will benefit people with a disability. You and your team have come up with a problem and brainstormed ideas to solve the problem. At the end of the Explore activity, your team decided which idea it thought would best solve the problem. It is time to design the solution. Do you remember what happens during this stage of the process of technology design?
In this Explain activity, Designing the Solution, you and your team will be thinking about the materials you will need and the time it will take to carry out your solution. You will also think about safety and other human factors that might affect your product. By the end of this activity, you and your teammates will have drawn or written the design plan for the solution, like the example in figure 4-6. Materials
-
Discuss the following questions with your teammates to begin thinking about human factors:
- What does it mean to say that human factors are important when designing technology?
- Why are human factors a constraint?
- What are the three main categories of human factors?
- How is safety a human factor?
-
For the design, your team needs to think about the constraints related to human factors. Make a list in your technology notebook to show the constraints related to the human factors that will affect the design. Be as specific as possible. For example, do not list, “It must be safe.” Instead, write specific ideas such as “the top of the design must come to a point, but it should not be so sharp that it can hurt someone.” Hint
-
Begin planning the design. Discuss your ideas with your team. Use your technology notebook to draw any sketches or rough drafts.
Decide, as a team, if you still think the solution you chose is the best for solving the problem. If so, continue to Step 5. If not, choose another solution from the Explore activity and repeat Step 3.
Make a list of the materials you will need to design the solution. You may be designing the actual product or a model of the product, depending on the solution you have chosen. You will not actually carry out the solution until the Elaborate activity. The Explain activity is about designing the solution, and being aware of materials you will need is an important part of design. Hint
-
In the Explore activity, you and your team decided on a solution that you thought would best solve the problem you chose. One way to analyze your work is to create a rubric. A rubric is a scoring tool. It helps you determine if the product meets your team’s characteristics for a good solution. Work with your team to create a rubric for the product by following Steps 6a–6c. Hint
-
Copy the table in figure 4-7 into your technology notebook.
Figure 4-7: This table will be the start of the rubric. You will fill it in to help you decide if the solution meets your team’s characteristics for a good solution.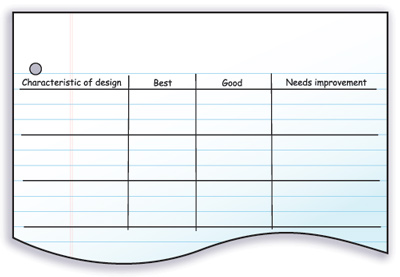
- With your team, come up with a list of the characteristics the product would need for it to be a successful solution. Think of the characteristics as goals for the product. List the characteristics in the left column. Hint
- For each row, fill in what would be required for the product to meet the characteristic in the best way, a good way, and a way that needs improvement. Hint
-
-
Sometimes coming up with specific characteristics for a rubric makes you realize that the solution may not work. Discuss with your team whether you still think the solution you chose is the best for solving the problem. If not, choose another solution from the Explore activity and repeat Steps 3–6. If you still think your solution is the best, continue to Step 8.
-
With your team, design one or more tests that will demonstrate how well the product meets the characteristics in the rubric. Be sure the test is fair. Write the procedure in your technology notebook. You will use this test in the Elaborate activity. Hint
-
Sometimes designing a test makes you to realize that the solution may not work the way you thought it would. Sometimes you realize that there is no good way for you to test the product. Decide if you still think your team’s solution is the best for solving the problem. Discuss your ideas with your team. If you do not think it is the best solution, choose a different solution and repeat Steps 3–8. If you do think it is the best solution, continue to Step 10.
-
Use different-colored pens or pencils to draw your team’s final design on white paper. Take time to add details and labels to the design. It should be clear to others what your team has designed. You can draw one final version for the whole team, but make sure everyone approves the drawing.
-
As a team, present the design to the class. Be sure to describe the problem you are trying to solve. For each team’s design, participate in a class discussion to help improve the designs.
Activity Overview
Before You Teach
Materials
For each team of 3 students:
- sheets of white paper
- pens or pencils of different colors
As You Teach
Outcomes and Indicators of Success
By the end of this activity, students will
-
consider the factors that will be important in designing a technological solution.
They will show their consideration by
- drawing a design of a solution
- listing the materials needed to create the solution
- presenting the design to the class
- considering the importance of coming up with a detailed plan for the solution.
-
decide on the characteristics that the technological solution needs in order to be successful.
They will show their decision-making process by
- creating a rubric that shows the characteristics and levels of achievement for the solution to be successful
- designing tests to make sure the design will meet the characteristics
- leading a class discussion about the design.
demonstrate an understanding of fair tests.
They will show their understanding by
- working with their teams to decide on the appropriate tests for the product
- writing a procedure for carrying out the tests.
Strategies
Getting Started
Have students read the introduction to the activity. If you have a poster that shows the process of technology design graphic, you may wish to refer students to it. You might also have them refer back to the chapter organizer to see where they are in their learning about carrying out the entire process of technology design.
Process and Procedure
-
Have a student or two remind the class what human factors are. Then, have students discuss the questions in Steps 1a–1d with their teams. They may need to refer to the Elaborate activity, Human Factors as a Design Constraint, in Chapter 2. Specifically, the Need to Know Types of Human Constraints in that activity will remind them about the information they will need in order to answer the questions. This is the first step in thinking about the constraints that students must consider when designing the technology.
-
Have students work in teams to come up with a list of constraints. The step directs students to be specific and make sure they consider the disability they are addressing. Make sure they have read and understood the entire step before they begin listing their ideas.
-
Students should continue working with their teams to come up with specific ideas about the technological solution. They might discuss what the technology looks like and what specific features it will have. It will help them if they make some sketches of the design.
-
This step has students think about whether the solution they decided on at the end of the Explore activity is still the best one for the team’s problem. You will see that many steps in this activity ask students to consider this question. The question reinforces to them that the process of technology design is not strictly linear and that they should always be considering whether the design will solve the problem. If, after discussing these initial plans, they do not think the design will work, they should return to their brainstorming lists from the Explore activity and choose a different solution.
-
Remind students of the materials you have available to them, if any. Also, remind them of whether they can use materials that they provide. During this step, they should make a list of the materials they will need to design the solution. Many will want to start collecting materials. Remind them that, at this point, they are simply making a detailed plan for the solution, and they will not begin to build the product until the Elaborate activity. They will have an opportunity to test different materials for different purposes in that activity, so if they are unsure about which materials to use, have them make a note about the possible materials so they can test them in the Elaborate activity.
-
Hold a brief class discussion asking students how they will know if the solution is a good one. You might remind them of the specific criteria listed when they built paper airplanes in Ideas That Fly, the Explain activity in Chapter 2. Tell them that a rubric is a way to list specific characteristics to help them decide if the solution is successful. In this step, they create a rubric for the solution. First, they copy the table in figure 4-7 into their technology notebooks. They then come up with the characteristics for the product. One example of a characteristic is listed in the hint for Step 6b. Another example is in the creation of a cup holder for a wheelchair. Students might come up with important characteristics, such as the holder
- does not fall off when a cup is put in it
- does not allow the contents of the cup to spill
- is conveniently located on the wheelchair.
In Step 6c, students should fill in each row with details about what it means if the solution is the best it could be, if it is a good design but could be improved, or if it needs improvement before continuing. One example is provided in the hint in the Student Edition. For the drink holder example above, the rubric might look like the one in figure T4-2.
Note that the rubric uses a wheeled chair, such as an office chair, to test the product because an actual wheelchair might not be available. Students should think about easy replacements like this when they are considering the criteria in this step and the tests in Step 8.
Students should again consider whether they think the design is going to be successful for solving the problem they chose. Many will want to rush through this step; however, make sure they understand that the goal at the end of the chapter is to have a successful product. If they have realized from the rubric that they might not have a successful solution, then they should choose another idea at this point.
In this step, students should design one or more fair tests to test the solution. They should design the tests based on the characteristics they listed in the rubric. As you are circulating around the room, make sure they are designing fair tests. They should write the procedure for the tests in their technology notebooks so they will remember all the steps when they actually test the final product.
Once again, have students consider whether the design is feasible. They may have realized in the last step that they could not design the tests in a way to make sure the product is successful. They may have realized as they thought about the tests that something in the design would not work. They may want to rush through this step, but make sure they do spend some time thinking about whether they will be able to test the product and whether they think it will be successful.
Provide students with sheets of white paper and different-colored pens or pencils to draw a picture of the final product. Although some will resist drawing, tell them that pictures are important because they act as a blueprint for what they will need to do for the design. Have them add labels and details to the pictures, but remind them that the picture’s purpose is to help others understand the design. If you are able, you might want to search the Internet for blueprints of machine designs so they understand that their drawings should not be like advertising illustrations, but rather like illustrations to show engineers how to make the product.
Allow each team time to present its problem and design to the class. Have the class ask questions and provide other ideas for improving the design. Students will reflect during the Reflect and Connect questions on how this discussion helped their own team’s design, so try to ensure that the discussion is useful. It may help to give students 2 minutes after each presentation to write down any questions they have, one thing they liked about a team’s design, and one thing they would change if it were their own team’s design. Then, make sure there is plenty of time for them to share their ideas. In a class of 30 students, there will be 10 teams, so you might allow 5 minutes per team for the presentation and discussion.