


Now that you have chosen an environmental issue to address and decided on a solution, it is time to design. In this Explain activity, Addressing the Problem, you will create detailed plans for your solution. You will then work to build a model of your solution. Materials
-
Review the choice you made during Step 9 of the Explore activity. Discuss whether this solution is still the one your team would like to design. Hint
-
Work with your team to decide on the details of your solution. Be sure that each of you is contributing helpful ideas to the conversation. Hint
-
Once you have some ideas, begin making sketches of your solution in your technology notebook. Make notes about the details of your solution. Once you have some ideas sketched in your notebook, share them with your team. Hint
-
As a team, decide if the solution you chose is still the best one to solve the problem. If so, continue to Step 5. If not, go back to your list of possible solutions from the Explore activity and choose a new one. Hint
-
Draw a “blueprint” or final sketch of your solution, like the one in figure 4-6. Label any important parts of the design. It should be clear to someone looking at your sketch what you are planning to do.
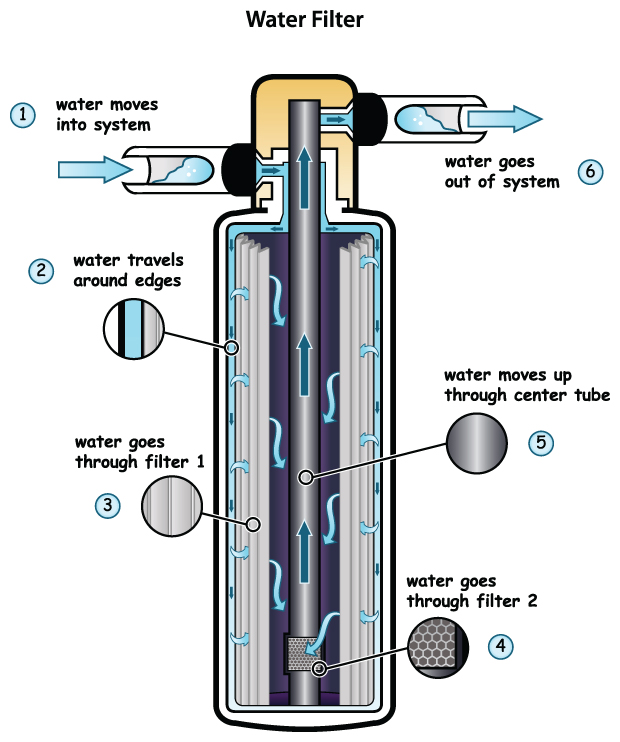 Figure 4-6: A blueprint of a filter. The Florida team from the Siemens Challenge finalists could have drawn a picture like this one to help them think about their filter design. Your blueprint should help other people understand your design.
 -
Decide on the materials you will need to create a model of your design. It may not be possible to create your actual design. Engineers often use models to help them test their designs. Use Steps a–f to help you.
- Draw a table like the one in figure 4-7 in your technology notebook.
- List the parts of your solution in the first column. Remember to include every part.
- Decide on a material to use for the part listed in the first row. Write that material in the first row of the second column. For example, you might list a plastic cup or a piece of aluminum foil.
- In the first row of the third column, explain why that material is a good choice for your model. In other words, why will that material represent your design well?
- Complete Steps c and d for the other parts of your design.
- Be sure to include materials such as tape or glue to hold your model together. Also consider any materials you might need to test the solution during the Elaborate activity. For example, if your environmental issue is air pollution, what are you going to use to represent air pollution?
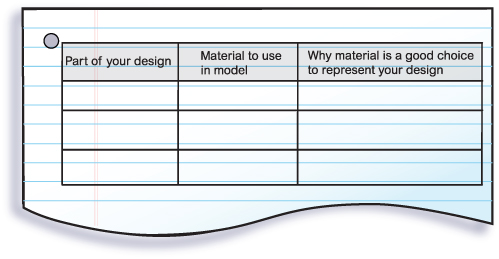 Figure 4-7: Materials table. This table will help you decide on your materials. List each part of your design in the first column. In the second column, list the material you would like to use to represent that part when you build your model. In the last column, explain why that material is a good choice to use to represent that part of your design. Be sure to include materials that you will need to test your solution, such as what you might use to represent the environmental issue.
 -
As a team, decide if you can create a reasonable model of your solution. If so, continue to Step 8. If not, what changes do you need to make to the design so that you will be able to create a model? Do you need to go back to an earlier step in the process of technology design?
-
Discuss your plan with your teacher. You should use your final drawing and your materials table to explain your plan. Make sure your teacher approves of your plan and your materials.
-
Build the model of your design according to your plan. Make sure all of your team members are involved in building the model of the solution. If you have to make any changes to your plan, be sure to revise your drawing and materials table. Explain why you made each change. Hint
-
Clean up your area. Store your model as your teacher directs.
Activity Overview
Students continue their work on addressing an environmental issue. They create detailed plans for their solution to the issue they chose in the Explore activity. They then build a model for the design.
Before You Teach
Materials
For each team of 3 students:
- white paper or graph paper
- colored pencils
- materials needed to create a model of the solution (see Advance Preparation)
Advance Preparation
By the end of this activity, students will create a model of the solutions they design. Start collecting materials early that students might use for their models. Students will work to come up with ideas for materials during the activity. Work together to decide how to acquire those materials. For example, you can decide whether they will need to bring in materials or if you will be able to provide them.
In addition, choose a place where the models can be stored without being disturbed, because students will use them again in the Elaborate activity.
As You Teach
Outcomes and Indicators of Success
By the end of this activity, students will
-
design a solution to an environmental issue.
They will show their ability to design by
- drawing a detailed blueprint of the design
- considering the materials they will need for their models
- building a model of the solution.
-
understand the strengths and limitations of a model.
They will show their understanding by
- describing the reason for the materials used to create the model
- listing strengths and limitations of the model.
-
demonstrate understanding of some phases of the process of technology design.
They will demonstrate their understanding by
- choosing which phases they worked on during the activity
- describing how they were doing that phase during the activity.
Strategies
Getting Started
Refer students to the Chapter Organizer. Have a student summarize what he or she has done so far in the chapter. Make sure that each team has a copy of its brainstorming list with the final solution circled.
Process and Procedure
Students should take a few minutes to discuss whether they still agree on the solution they came up with at the end of the Explore activity. Take this opportunity to emphasize that technology design is not a step-by-step, linear process, so if students realize at some point that their solution will not work, they are free to go back to earlier phases of the process.
- Teams should work to design the details of their solution. They should begin taking notes and making sketches of the design. As you circulate around the room, make sure that students are adding enough detail. Remind them that they want to end up with plans that are detailed enough for someone outside the team to follow.
Make sure that students consider whether they think the solution is still the best one. As they have had discussions about the details, they may have realized that the solution will not work. Many students will try to skip this step, but as described in Step 1 of the teacher materials, it is important for students to continue considering their design so they can go back to an earlier step in the process if necessary. Designing technology is focused on coming up with the “best” solution for the situation, so students should continually evaluate whether their solution will work well for the purpose they have in mind.
Once students have worked out the details, one student in the team should draw a final blueprint or sketch of their solution, using colored pencils. If possible, give students a choice of drawing their blueprint on plain, white paper or on graph paper. Some students may prefer graph paper so they can draw their blueprints to scale or with very specific details. Remind students that labels are an important part of making a drawing understandable.
Students should use the table to help them decide on materials for their model. They should work as a team, but each student should have a copy of the table in his or her technology notebook. Students should list all of the parts of their solution, including items such as adhesives. The team should then decide on the materials to use. The third column is important because it has students justify why they chose the materials they did. This helps them be more thoughtful about their materials rather than just choosing whatever material they think of first.
Again, teams should evaluate whether they can create their model and if their solution is a reasonable one. Be sure to have students stop and dedicate some time to this step rather than skimming through it.
-
Circulate around the room and work with each team on its materials list. They should describe their plans to you.
If you will be providing all of the materials, make sure they have chosen items that you have available. If you will allow students to bring materials from home, make sure that the items seem reasonable to bring in.
You may want to remind them that they will need to test their models in the next activity, and encourage them to consider what additional materials they might need to do so in the context of the environmental issue they are addressing.
For example, if they are working on a solution to clean up oil spills, they might need vegetable or mineral oil, water, and a large bowl in addition to any materials they need for the model of the solution.
Allow students enough time to build their models. They should not test their models at this point. If they do have to make changes to their designs, they should revise their plans and materials. However, point out that any changes at this time should be to address difficulties in building the model; for example, if their chosen adhesive did not stick or the pieces did not fit together as they were supposed to.
Direct students where to store their models, and make sure they clean up any materials they have left over.