


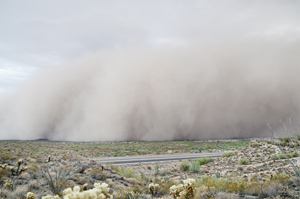
In the Engage activity, you thought about ways that houses may be different in different surroundings. Architects, engineers, and builders can choose between many designs for each surrounding. For example, houses near the coast may be built on stilts or above the tidal zone to keep dry. Houses in the desert may be built from adobe or even underground to keep cool. Many choices can also be made when designing buildings to withstand weather-related events. Which choices might designers consider, for example, when building a house in an area that experiences extremely strong winds? (See figure 4-4.) Are some choices better than others? In this Explore activity, Standing against the Wind, you will investigate how choices about materials and design affect how a structure stands up to a strong wind. Materials
Set up your technology notebook for a new activity. Remember to include the title of the activity and the date. Add this information to your table of contents.
Watch the demonstration that your teacher will perform.
With your teammates, discuss how you would make a paper house more sturdy and better able to stand up to the wind than the paper house you saw in the demonstration. Write your ideas in your technology notebook. Hint
-
Read Steps 5–15 before you begin working on your team’s paper house. This will help prepare you for the rest of the activity. Hint
Your task in this investigation is to work with your teammates to design a paper house that will stand up to the wind. Read Need to Know: Building Basics for some basic information about building a house.
-
Be sure the house you design meets these requirements:
- It must have a floor, walls, and a roof.
- It must be large enough for a 6 centimeter (cm) person to be able to stand up and lie down inside.
- It must sit on the cereal box, which represents the ground. (You may poke holes in the ground, but the holes cannot be bigger than the width of a pencil.)
Your team’s design must include only materials that you will buy at the class supply store. Discuss the optional materials with your teammates and decide what you will buy. See figure 4-6 for a list of the supplies and their prices. Your team has 30 tokens to spend at the supply store. Each token is worth 10 cents. Hint
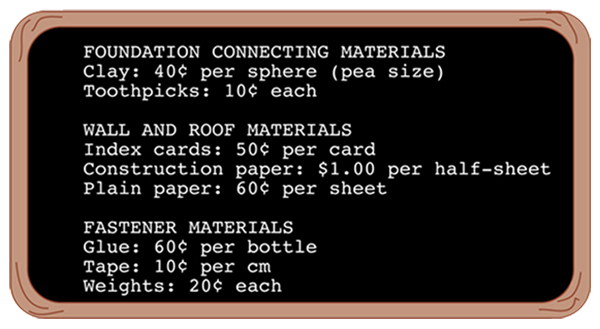 Figure 4-6: You may purchase construction materials from the class supply store. Your team’s plastic tokens for buying these supplies are worth 10 cents each.
 Draw a table like the one in figure 4-7 in your technology notebook. Use this table to record what your team plans to buy. You may want to wait before you add the “total spent” line so you have enough room in the table. This table will help you keep track of your team’s total cost for the house. If the materials in your team’s plan cost more than 30 tokens, you will have to decide what is needed the most. Hint
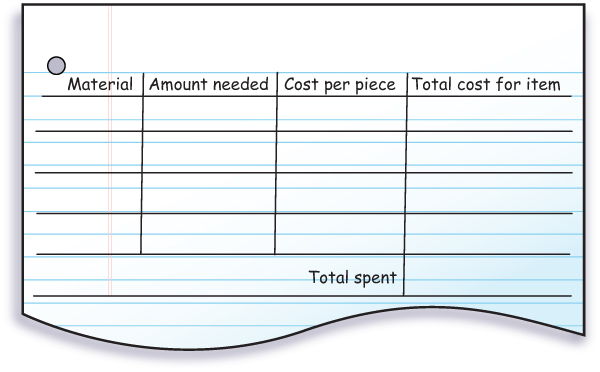 Figure 4-7: Table for tracking purchase of supplies.
In your technology notebook, draw the plan of the house you and your teammates will build. Hint
Show your team’s plan to your teacher. Also show your teacher the list of materials your team plans to buy with the tokens.
Build the house according to your team’s plan. You may buy additional materials if you have tokens left over. Hint
When your team’s house is completed, use a pen or pencil to make an outline of the house as it sits on the cereal box. This line will mark the foundation of the house.
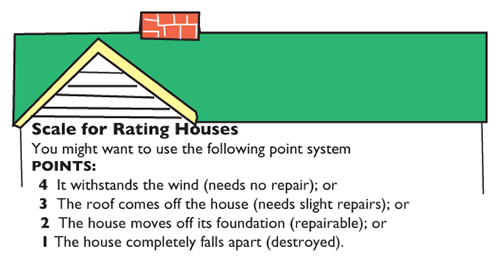
Participate in the class test of the houses. Use the scale shown in figure 4-8 to rate your team’s house and the houses of other teams. Make sure you record the results from the test of your team’s house in your technology notebook.
As a team, discuss the characteristics of the house that stood up best against the wind.
With your teammates, redesign your team’s house by using evidence from the class test. To keep track of your changes, draw a two-column table in your technology notebook. In the first column, list the evidence that led to the change. In the second column, list the change your team made.
Test your team’s house again. Record the results in your technology notebook.
- Did the changes to your team’s design improve the house in the wind test?
- What other changes might you want to make?
Need to Know: Building Basics
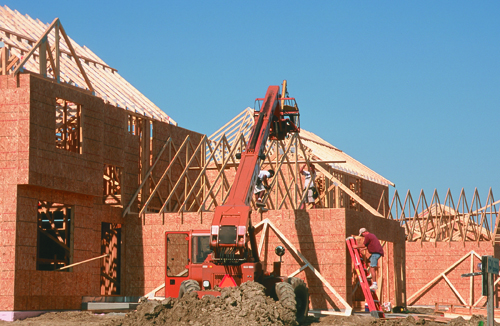
People build houses to provide shelter. A house typically has a foundation, a frame, floors, walls, and a roof. Many modern houses are called frame houses because the builders construct a frame of wood on a foundation, to which the walls and roof are attached. (See figure 4-5.) Other houses, such as some log cabins, do not have a frame, and the walls are attached to the roof.
If you were building a frame house in an area with strong winds, you would design it to withstand the wind. You would choose wall and roof material that is durable, for example, and you would attach the frame securely to the foundation. In this investigation, you will make design choices as your team builds a house to withstand the wind.
Activity Overview
In the Engage activity, students considered whether design features are related to appearance or function. They also considered how design may be influenced by location. In this Explore activity, Standing against the Wind, students will design and build models that will stand up against the wind. They will test their models and modify their designs based on the test results.
Before You Teach
Materials
For the demonstration:
- 1 copy of Master 4-1, Model House, Part 1
- 1 copy of Master 4-2, Model House, Part 2
- 1 copy of Master 4-3, Wind Scale Design
- 1 cereal box partially filled with rocks or gravel, or 1 piece of cardboard taped to a ring stand
- 1 large paper clip
- 1 piece of paper
- transparent tape
- glue (optional)
- 1 box fan or blow dryer
For the entire class:
- 1 box fan or blow dryer
- 1 wind scale mounted on a box
For the class supply store:
- 1 roll of transparent tape
- 20–30 sheets of white paper, 8.5 × 11 in.
- 10 sheets of construction paper, 9 × 12 in.
- 40 index cards, 3 × 5 in.
- 1 box of toothpicks
- 10 bottles of glue or glue sticks
- 40 washers (weights)
- 1 stick of modeling clay
For each team of 3 students:
- 1 empty cereal box
- 1 metric ruler
- scissors
- 30 plastic tokens
Advance Preparation
Assemble the model house for the demonstration using copies of Master 4-1, Model House, Part 1, and Master 4-2, Model House, Part 2. Use a minimal amount of tape and reinforce the model only enough so that it stands just before you turn on the fan or blow dryer. This model house is meant to fall apart in the wind during your class demonstration.
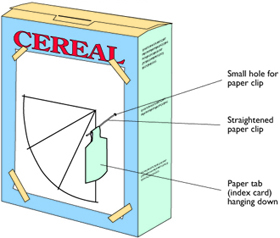
Make the wind scale using a copy of Master 4-3, Wind Scale Design , and taping or gluing it to the back of a cereal box or to a piece of cardboard taped to a ring stand. If you use the cereal box, fill it with rocks or gravel so that it stands securely. Unwind the paper clip and attach a piece of paper to it as shown in Wind Scale Design. Poke the paper clip into the wind scale so that when you turn on the fan or blow dryer, the paper swings freely on the wire. (See figure T4-1.) Make the holes in the paper and the box as small as possible.
Gather the materials for the class supply store. These are the construction materials that teams will purchase to build their models.
As You Teach
Outcomes and Indicators of Success
By the end of this activity, students will recognize that some materials may function better in a design than others.
They will demonstrate their recognition by
- suggesting changes to the materials used in the design of a paper house model
- selecting materials for the model’s design
- altering the design to improve the function of the model in a test
- evaluating other models to identify features that may make those models successful in the wind test.
Strategies
Getting Started
Begin by having students review the chapter overview and the goals for the chapter. Allow time for them to ask questions or make comments about the lists they made in the Engage activity before starting this Explore activity.
Process and Procedure
Instruct students to begin this activity by setting up their technology notebooks for a new activity.
Perform the demonstration with the paper house that you assembled before class. The model you construct and use for this demonstration will be rather flimsy and probably will not perform well in the test against the wind.
Students should work in teams of three to develop a list of ideas for designing a paper house that will remain standing during the wind test. Teams should write several ideas. They may come up with very elaborate plans and ideas at this point.
Tell students that they will be working with their teammates to design, build, and test paper houses with the goal of making one that will stand up in the wind. Encourage them to read all the steps in Process and Procedure before beginning their design work. By reading through the steps in advance, they will have a better overall understanding of the activity. After they have a chance to read through the steps, allow time for them to ask questions about the task.
Need to Know: Building Basics provides some basic information about construction that students may find useful.
- Students should work with their teammates to plan the paper house design. Teams need to determine which materials they will use and make sure they have enough tokens to purchase the materials they need for their plans.
Teams should show their plans to you before they begin building the house. As you review each plan, ask the team members questions to make sure that the house will be built according to the required guidelines in Step 6. Have teams also show you the list of supplies that they wish to purchase for the design. Teams do not need to spend all their tokens at this time.
- Teams should construct their paper houses according to their design plans. Encourage students to do some preliminary tests of the design. These preliminary, informal tests can sometimes reveal design flaws that they can easily fix.
When all teams have constructed their paper houses, conduct tests of the houses using the fan (or blow dryer) and the wind scale. The point scale shown in figure 4-2 provides a method for rating the success of the designs. An alternative scoring system is shown in figure T4-2.
After all the houses have been tested, ask the class to identify the design that functioned best in the test. Ask students which design features of that house were responsible for its superior performance.
- Ask students to return to their teams and refine their designs. They should base their changes on evidence that they saw in the test. The two-column table described in Step 14 will help them keep track of their evidence and design changes. Allow time for teams to change their houses before retesting them in the wind. Students should enter the results of the tests in their technology notebooks, along with any other ideas for improving the design. It is more important that they are able to explain what they designed, and why, than it is that the designs actually test well.
