


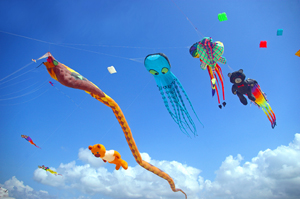
In the Engage activity, you considered how water moves in the atmosphere. But water is not the only thing in the atmosphere that moves. Have you ever flown a kite (see figure 1-4)? If so, you know it is easier to keep the kite up if the air is moving. What causes air to move in the atmosphere? In this Explore activity, Wind in a Box, you will conduct an investigation to identify causes of air movements. By exploring air movements on a small scale in the science classroom, you will begin to understand how air movements occur in the atmosphere. Materials
-
Set up your technology notebook for a new activity. Remember to include the title of the activity and the date. Add this information to your table of contents.
-
Read through Steps 1–9 so you are familiar with the steps of the investigation. Prepare your work space for the safe use of the convection boxes.
 Follow safety rules during this
investigation. Move books, papers, and extra notebooks to the
side of the classroom, tie back long hair, wear safety
goggles, and move slowly while the convection boxes are in
use. NEVER LEAVE A BOX UNATTENDED. Hint
Follow safety rules during this
investigation. Move books, papers, and extra notebooks to the
side of the classroom, tie back long hair, wear safety
goggles, and move slowly while the convection boxes are in
use. NEVER LEAVE A BOX UNATTENDED. Hint
-
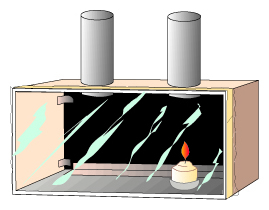
Stand the convection box on its side, with the tubes facing up. Remove the lid from the box.
-
Carefully light the candle and place it directly under one of the tubes. (See figure 1-5.) Be careful not to place the candle too near the back or sides of the box.
-
Put the lid on the box.
-
Carefully light a wooden splint and then blow it out. Lower the smoking splint 1 or 2 cm into the tube above the candle.
-
Observe what happens to the smoke. Record your observations in your technology notebook. Hint
-
Lower the smoking splint 1 or 2 cm into the other tube and observe what happens. Use a different-colored pen or pencil to record your observations. Make sure you record which tube the splint was lowered into. Hint
-
Extinguish the candle.
-
Return the materials.
A smoking splint can cause burns or fires
because it is very hot. Be careful not to touch yourself, a
teammate, or the box with the smoking part of the splint. Put
the splint in the container of water after you are done with
it.
Activity Overview
In the Engage activity, students used two models to observe the movements of water. Now they will build on the idea of movement in this Explore activity, Wind in a Box. In this activity, they will investigate the movements of air using a convection box. More specifically, they will investigate how temperature influences the movements of air in the atmosphere.
Before You Teach
Materials
For the entire class:
- 1 fire extinguisher
For each team of 3 students:
- 1 convection box (see Advance Preparation)
- 1 votive candle (short, thick candle) with a holder
- 1 box of safety matches
- 6 wooden splints
- 1 container of water for holding used splints
- 3 pairs of safety goggles
- pens or pencils of different colors
For 10 convection boxes:
- 10 shoe boxes
- 20 toilet paper tubes (see alternative instructions in Advance Preparation)
- 10 sheets of black construction paper
- 1 metric ruler
- 1 pair of scissors
- 1 roll of aluminum foil
- 1 roll of plastic wrap
- 1 roll of transparent tape
Advance Preparation
Prepare enough convection boxes so that each team of 3 students will have 1. Prepare each convection box using the following steps.
- Line 2 toilet paper tubes with aluminum foil. Be sure to cover the inside and edges of each tube completely.
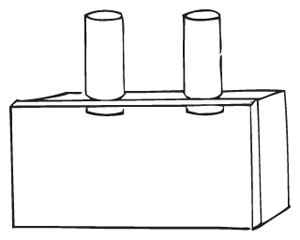
- Cut 2 holes in 1 of the long sides of the shoe box about 15 cm apart. Make the holes just big enough for the tubes to fit through. Cut the holes toward the end of the box and far enough back so the lid will still fit snugly. See figure T1-1.
- Insert the foil-lined tubes into the holes so they extend 1 cm into the box. Fasten them into the openings with tape. Seal any leaks so that the tubes have a very tight fit.
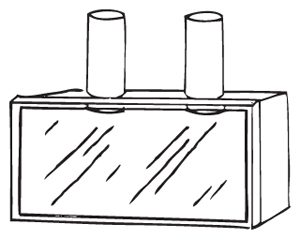
- Cut the black construction paper to fit the bottom of the shoe box. Tape it into place so that when the box is on its side, the construction paper covers the “back” of the box.
- Cut a large window (almost as large as the lid) in the lid of the shoe box. Cover the window with plastic wrap, and tape it securely. The box should look like the one in figure T1-2.
Alternative Instructions for
Constructing Convection
Boxes
Instead of using toilet paper tubes, you can make tubes using black construction paper. For each box, cut a sheet of construction paper in half. Cover one side and the edges of both half sheets with aluminum foil. Roll each half sheet of construction paper into a tube with the foil on the inside. Fasten with tape. Proceed with Step 2 above to build the convection boxes.
Cautions
- Check the convection boxes to ensure that the tubes are completely covered with foil.
- Have students with long hair tie their hair back.
- Remove papers from desktops.
- Be sure students wear eye protection.
- Have a working fire extinguisher in the room and know how to use it.
- Teach students how to strike a match properly—close the matchbox and strike it away from themselves and others.
- Teach students to dispose of used matches and splints by putting them in a container of water.
As You Teach
Outcomes and Indicators of Success
By the end of this activity, students will
-
become aware of the patterns that form when air is warmed.
They will demonstrate their awareness by
- describing the patterns of smoke moving within a convection box
- contrasting the behavior of cold air and warm air
- proposing an explanation for what they have observed.
-
begin connecting their knowledge about air movements to weather phenomena.
They will show their understanding by comparing what they observed in the convection box investigation to what occurs in real-life movements of warm air.
Strategies
Getting Started
Have students look again at the chapter organizer. Remind them that they considered the movements of water during the Engage activity. Inform them that they will now investigate air movements. Ask them to read the introduction to the activity.
Cautions
Inform students that they will be working with matches during this activity. Review safety practices with them, including the location of the fire extinguisher. Have them tie back long hair and put on safety goggles before they begin the investigation. Demonstrate the proper striking of matches, lighting of the splints, and disposal of used matches and splints. Also, show students the proper setup and use of the convection boxes.
Process and Procedure
Have students prepare their technology notebooks for this activity.
Instruct students to read through all the steps in Process and Procedure before beginning the investigation. Allow time for them to ask questions about the procedure so they understand the steps and are aware of the safety practices they must follow during the investigation.
- Students should work through all the steps in the investigation and make their observations. Assist any teams that have trouble getting the air in the convection box to circulate. Keeping the box closed tightly will produce the desired circulation pattern. Monitor students’ work to ensure they are working safely and are following the procedure closely.