


Part I: Wind and Earth's Rotation
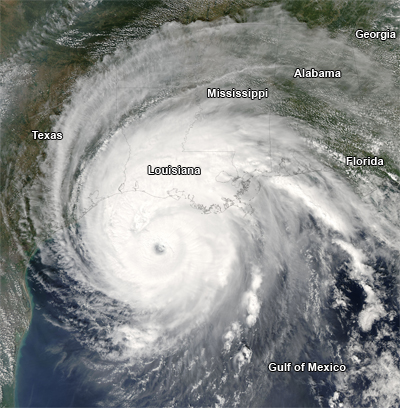
NASA image courtesy Jeff Schmaltz,
MODIS Land Rapid Response Team at NASA GSFC
When you have been outdoors, you have experienced a light breeze. You have probably also experienced a stronger wind. Hopefully, you have not experienced the high winds of a tornado or hurricane. (See figure 1-14.) In the previous activities, you have learned about water and air movements in the atmosphere. In this Elaborate investigation, Winds above a Rotating Earth, you will apply your understanding to answer the question, “How does Earth’s rotation affect the movements of the wind?” Materials
-
In your technology notebook, write the question, “How does Earth’s rotation affect the movements of the wind?” Write your best answers to the question.
-
Obtain the materials you need for the investigation.
-
Trim the paper so it is the same size as the piece of cardboard.
-
Poke a pen or pencil through the center of the cardboard as shown in figure 1-15. The cardboard should spin freely on the pen or pencil. Hint
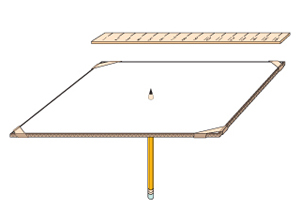 Figure 1-15: The cardboard is ready to spin on the pencil. The paper is on top of the cardboard, and the ruler is held horizontally above the cardboard.
 -
Tape the sheet of paper onto the cardboard. The pen or pencil should pass through the paper so that the paper and cardboard can spin, as shown in figure 1-15.
-
Practice spinning the cardboard on the pen or pencil.
-
Decide which team member will be responsible for each task in the investigation. Hint
- One teammate will spin the cardboard.
- One teammate will hold the ruler.
- One teammate will draw the line.
-
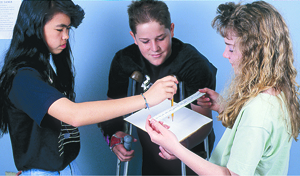
Have one teammate hold the ruler 5 cm above the middle of the cardboard, as shown in figure 1-16. Do not move the ruler.
-
For the first trial, one teammate will hold the cardboard still. The second teammate will hold the ruler still. The third teammate will draw a line by moving a felt-tipped pen along the ruler. Mark this line as “line 1.”
-
For the second trial, spin the cardboard while one teammate draws a line on the cardboard. Use a different-colored felt-tipped pen to draw this line. Again, the ruler should be held still and the line should be drawn by moving the felt-tipped pen along the ruler. Mark this line as “line 2.”
-
Take turns switching jobs so that each teammate has a chance to draw a line across the paper. Use a different color each time.
-
Record your observations in your technology notebook. Hint
 Stop and Think
Was the way the felt-tipped pens moved the same in both trials? Imagine that you were unable to see the cardboard. In what ways were the two lines similar or different?
What caused the differences you observed between lines 1 and 2?
In the investigation, the cardboard could represent Earth. What could the spinning represent?
The lines you drew could represent the wind. How can this investigation help you understand patterns of wind on Earth? Hint
Part II: The Coriolis Effect
In your investigation using the spinning cardboard, the line you drew when the cardboard was spinning looked different than the line you drew when the cardboard was not spinning. Work through the simulation How the Wind Blows to further investigate patterns of wind.
Read the Need to Know The Coriolis Effect to help you understand how the investigation you just completed demonstrates a phenomenon that occurs in our atmosphere. Hint
Scientists have used a special kind of pendulum called a Foucault pendulum to help them understand the Coriolis effect. A Foucault pendulum has a very long cable and a very massive bob, or weight, at the end. Use what you know about pendulums to describe how a pendulum moves. Write your description in your technology notebook.
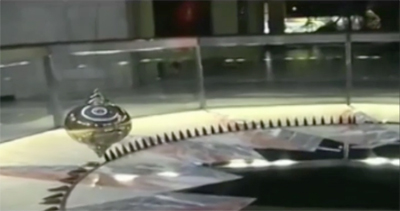
Watch Video 1. The video shows a Foucault pendulum at the Houston Museum of Natural Science. Is the description of pendulum movement that you wrote in Step 3 similar to what you see in the video? Revise your description if necessary.
Imagine that you come back to observe the pendulum 6 hours after Video 1 was taken. What do you think you would see? Write your predictions in your technology notebook. Hint
Now watch Video 2. It also shows the Foucault pendulum at the Houston Museum of Natural Science. In your technology notebook, do the following:
- Describe your observation of what occurred in the video.
- Write your ideas about how this does or does not support your predictions in Step 5.
- Explain in writing why this event occurred.
- Read the Need to Know Foucault Pendulums and the Coriolis Effect to see how one scientist used a simple technology that depended on the Coriolis effect to make a historic discovery.
- Refer to your answer in Step 6c. How would you answer now? Revise your answer using different-colored pen or pencil.
Need to Know: The Coriolis Effect
The simulation How the Wind Blows should help you appreciate how seeing something from a rotating Earth is different than if Earth was not rotating. If you could look at the direction of the wind from above Earth, it would look like the air is moving in a straight line. However, when you are on Earth, Earth’s rotation makes it appear that the wind is curving. This difference is known as the Coriolis effect. When we describe winds from the perspective of our Earth’s rotating surface, we must consider Earth’s rotation along with factors such as convection cells, friction between air masses, and differences in air pressure.
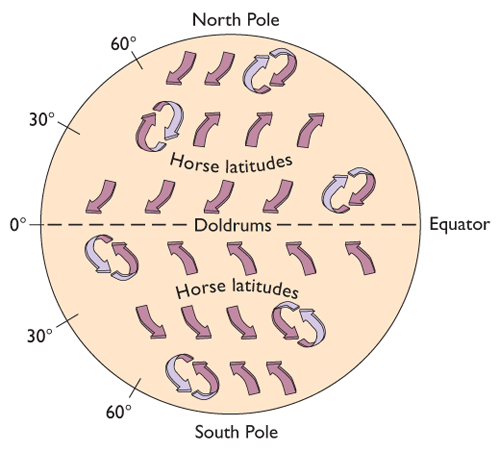
The diagram in figure 1-17 shows that winds do not move in straight north and south lines across the surface of Earth. Scientists have noted that winds in the Northern Hemisphere curve in a clockwise direction and winds in the Southern Hemisphere curve in a counterclockwise direction. As a result, winds curve in more complicated patterns than suggested by the simple convection cell model that Hadley proposed.
Need to Know: Foucault Pendulums and the Coriolis Effect
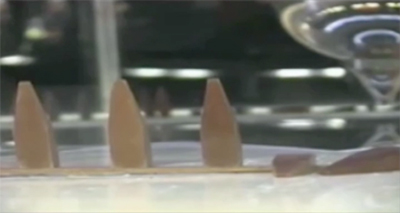
In 1851, Jean-Bernard-Léon Foucault, a French physicist, built a pendulum with a long rope and a massive bob for an investigation. Pendulums of this type are now called Foucault pendulums. Like other pendulums, a Foucault pendulum swings back and forth along a straight path if no other forces are acting on it. So how can we explain what occurs over time with Foucault pendulums like those you saw in Video 1 and Video 2? How can we explain that the pendulum seems to change direction over time? (It continues to knock down more pegs around the circle.)
You might say that it depends on how we look at it. Imagine that you could hover in place, looking down on the pendulum. From this viewpoint, all you see below you is the pendulum. You do not see the ground or anything else. From this viewpoint, you see the pendulum swing back and forth in the same direction for as long as the pendulum keeps swinging. So if the swing of the pendulum is not changing, what is the explanation?
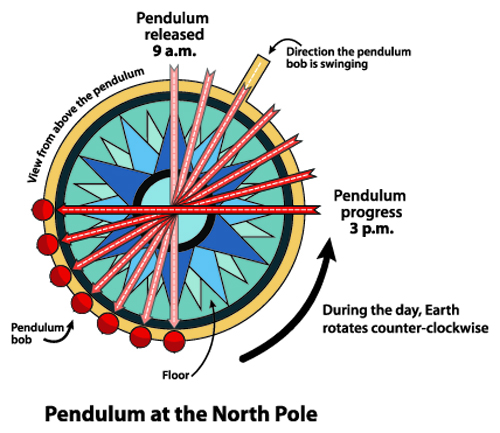
Again, imagine that you are hovering in place over the pendulum, looking down. This time, however, imagine you see Earth. What is happening to Earth? It is rotating! So now as the pendulum continues to swing along its same path, you see Earth rotating under it. (See figure 1-18.)
If you watch the Foucault pendulum from the ground, you have a very different idea of what is happening. From the ground, it looks like the pendulum has changed its swing. If you watched a Foucault pendulum in a science museum—there may be one in a museum near you—for a long period of time, you could see it knock down the pegs all around the circle. This is similar to what you saw in Video 2.
The location of a Foucault pendulum determines how long it takes to make a full circle rotation. If you observed a Foucault pendulum at either the North or South Pole, the pendulum would rotate 360 degrees in 24 hours. In other words, it would take one day for the pendulum’s swing to rotate around a complete circle. If the Foucault pendulum were at the equator, you would not see the Coriolis effect. The pendulum would always appear to swing in the same direction. Between the poles and the equator, the time it takes for the pendulum to rotate 360 degrees varies. For example, the Foucault pendulum at the Houston Museum of Natural Science rotates around the full circle in about 48 hours.
A pendulum (even a very large one) may seem like a simple piece of technology. However, Foucault was able to use one to make a very significant contribution to science. He is credited with providing the first evidence that Earth rotates on its axis.
Activity Overview
The Elaborate activity, Winds above a Rotating Earth, builds on students’ understanding of air movements and wind. In the Explain activity, students learned how temperature, pressure, and density interact to cause air movements. In this activity, they will learn how the shape of Earth affects wind patterns and about the Coriolis effect—the apparent change in direction of an object due to Earth’s rotation.
Before You Teach
Materials
For each team of 3 students:
- 1 square of corrugated cardboard, at least 25 × 25 cm (10 × 10 in.)
- 1 pencil or pen
- 1 sheet of 8-1/2 × 11 in. paper
- 1 5 cm strip of masking tape
- 2 felt-tipped pens, different colors
- 1 30 cm (12 in.) ruler
- 1 pair of scissors
- pens or pencils of different colors
Advance Preparation
Gather the materials that students will need and cut the cardboard to the appropriate size. To make the process simpler for students, you may want to poke holes in the center of each cardboard piece. Practice the activity in advance so you are familiar both with the process and with the desired outcome. In particular, it will be helpful if you are aware of the speed that the cardboard should spin to achieve the best results.
As You Teach
Outcomes and Indicators of Success
By the end of this activity, students will
-
demonstrate their understanding of how Earth’s rotation affects wind movements.
They will show their understanding by
- describing their experiences with felt-tipped pens moving over both a rotating and a nonrotating surface
- recognizing that the line they drew is an analogy for the way winds move across Earth’s surface
- proposing how wind movements affect weather patterns in the region where they live.
-
demonstrate their understanding that the Coriolis effect refers to the apparent change in direction of an object that can be explained by Earth’s rotation.
They will show their understanding by
- working through an interactive activity to explain wind direction
- explaining how a Foucault pendulum demonstrates Earth’s rotation.
Strategies
Getting Started
Have students look at the chapter organizer and determine what they have learned so far in the chapter. Help them recall what they have learned about air movements and the influences of temperature, air pressure, and density. Explain that they will now be learning more about winds in the atmosphere.
Process and Procedure
Part I: Wind and Earth’s Rotation
-
Students will begin this activity by writing their best answers in response to the question, “How does the Earth’s rotation affect the movements of the wind?” At this stage, students may be unsure of their answers. Encourage them to share their ideas because the goal is to allow students to share what they know now, to hear the ideas of their classmates, and to compare these ideas with what they think after doing the activity.
- Ask students to read through Steps 2–12 to become familiar with the procedure they will follow in the investigation. Before beginning the investigation, ask for volunteers to help you demonstrate the activity. One volunteer can hold the ruler and one can hold the pen or pencil with the cardboard and paper. Show students how they will hold the felt-tipped pen to draw a line. At this point, do not actually draw the lines—allow students to discover the outcomes when they do the activity. Make them aware that they will do two trials, one while the cardboard is not spinning and one while the cardboard is spinning. Point out the following three things they could do that will make the activity more successful:
- When the teams spin the cardboard, they should do so at a moderate speed. If the cardboard is spinning too fast, they will not draw continuous lines.
- The felt-tipped pen should barely touch the cardboard. If pressed down too hard, the friction will stop the spinning.
- To draw the line, students should move the pen in the direction opposite to the spin.
Answers to Stop and Think Questions⎯Part I
Ask students to answer these questions in their technology notebooks. If you feel it would be helpful for your students, you can discuss their answers before they move on to Part II. Alternatively, you could discuss all questions after students have finished Part II.
Was the way the felt-tipped pens moved the same in both trials? (Imagine that you were unable to see the cardboard.) In what ways were the two lines similar or different?
What caused the differences you observed between lines 1 and 2?
In the investigation, if the cardboard were to represent Earth, what might the spinning represent?
If the lines you drew were to represent the wind, how might this investigation help you understand patterns of wind on Earth?
Students should have seen a straight line when they did the initial trial when the cardboard was not spinning. When the cardboard was spinning, students should have seen a broadly curving line on the paper even though the pen moved straight along the ruler.
The only difference between the two trials was that the cardboard was spinning in the second trial. Therefore, the differences between the two lines were due to the spinning.
If the cardboard represents Earth, then the spinning of the cardboard represents the rotation of Earth around its axis.
If the lines represent wind, then the first line that students drew represents wind moving in a straight line if Earth were not rotating. The second line, with a very different pattern, shows how wind direction seems very different if Earth were rotating. At this point, students may think that wind direction is very complex. They may have different ideas about how to answer this question. They may also think of new questions about wind after this investigation. If so, explain that they will be doing another activity to deepen their understanding of the effects of Earth’s rotation.
Part II: The Coriolis Effect
-
Students will now work through the interactive activity How the Wind Blows to learn more about wind direction. This simulation introduces them to the Coriolis effect. It also should reinforce the idea from Part I, Wind and Earth’s Rotation, that Earth’s rotation affects wind direction. In addition, a key point in this simulation is that a person’s perspective influences how that person views events. In the case of wind, we see an apparent change in wind direction because we are on a rotating Earth.
Note: Most of the simulation uses a cloud in the Northern Hemisphere as an example for students to work through. In the last part of the simulation, students are asked to predict the apparent change in direction of cloud movements (wind) in the Southern Hemisphere. The main point of the simulation that students should understand is why there seems to be a change in direction when we view this phenomenon from a rotating Earth.
Reading Need to Know: The Coriolis Effect will further explain the Coriolis effect for students.
- In these steps, students will explore a type of pendulum called a Foucault pendulum. This pendulum provides another example of the Coriolis effect.
The Need to Know Foucault Pendulums and the Coriolis Effect provides additional information about Foucault pendulums and how they demonstrate the Coriolis effect.
Have students revisit their answers to Step 6c. They should revise their answers using a different-colored pen or pencil.