In the first two activities of this chapter, you investigated water and air. Did you know that the movements of water and air cause changes in weather? In this Explain activity, Weather and the Movements of Water and Air in the Atmosphere, you will investigate what causes these movements. You will also think about how water and air movements can cause changes in weather. Materials
-
Write down the following focus question in your technology notebook and draw a box around it. Then, write your best answers to the focus question.
“How do the movements of water and air cause changes in the weather?” Hint -
To help you understand more about the movements of water, read The Water Cycle. As you read, write any bold or unfamiliar words in your technology notebook. Hint
The Water Cycle
If you have been soaked in a rainstorm or trapped in a snowstorm, you have experienced weather events related to water. The air around you has water in it, water that you cannot see under normal circumstances. Water in the air is present in microscopic particles. If you live where it is very humid, you probably have experienced the feeling of water in the air. If you live in a dry area, you may have never noticed the water that is in the air and all around you.
When the tiny water particles in the air come in contact with something cool, they clump together to form drops of water. This process is called condensation.
When tiny water particles move into the air, the process is called evaporation. People often think that when water evaporates, it disappears, but in fact the small particles of water are now in the air.
The process of water evaporating and then condensing happens all the time in nature. The pattern of water movements on Earth is called the water cycle. Water is constantly on the move. In some cases, it is going into the air, or evaporating. In other cases, it is coming out of the air, or condensing. In the Engage activity, the water on the outside of the can was water that had condensed. That water had been in the air surrounding the can. As it cooled, it condensed on the outside of the can.
The movements of water are responsible for much of the weather. Remember that when rain or snow is falling, water is moving out of the air. When it is a sunny day, water is evaporating and moving into the air.
But why does water move? The short answer is because of thermal energy—or heat. If the liquid water is heated enough, it changes from a liquid to a vapor. Water vapor is a gas. When liquid water is heated, the particles in the water spread farther apart and some of the liquid water becomes a gas. When the Sun warms the water in lakes, rivers, oceans, and even puddles, the water gradually evaporates—or changes from a liquid to a gas.
If air containing water vapor cools, the cooling causes the water to lose thermal energy. As it loses energy, the water particles move closer together and the water vapor (gas) changes into liquid water. If water continues to lose energy, it will continue to cool off until finally it changes from a liquid to a solid. In other words, it becomes ice.
Now let us think about how this applies to weather. As the moist air—air filled with water vapor—rises away from the warm surface of Earth, the air and water vapor cools. When the water vapor becomes cool enough, it condenses into tiny water droplets and forms clouds. (See figure 1-6.) When a lot of water in the air condenses, the droplets in the clouds become larger and heavier and eventually fall from the clouds as rain.
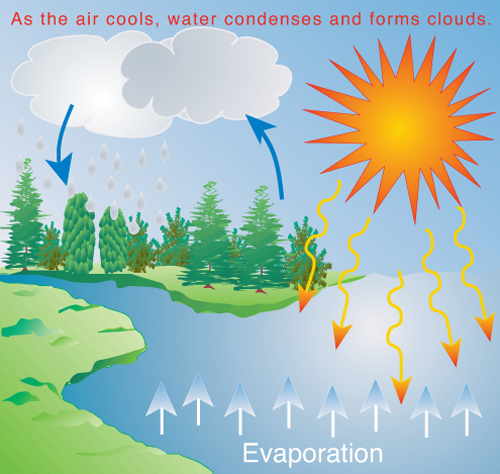 Figure 1-6: The water cycle. Because water is frequently condensing (losing heat energy, or cooling) or evaporating (gaining heat energy, or warming), water particles are constantly moving.
Think back to the demonstration using the glass containers.
- How did that demonstration represent the water cycle? Use the words condensation and evaporation in your answer. Hint
- In the glass container demonstration, where is energy being absorbed by water? Explain your answer.
- In the glass container demonstration, where is energy being released by water? Explain your answer.
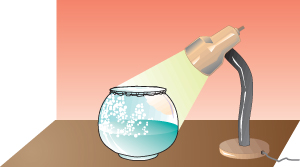 Figure 1-7: Glass container. When your teacher originally set up the glass container with the water in it, the sides of the fishbowl were dry. Where did the water droplets come from?
San Francisco is a city in California that is very close to a lot of water. It is often very foggy in San Francisco. Fog is similar to a cloud, but it is very close to the ground. Draw a picture to show what you think happens to make the fog lie close to the ground. Hint
Your teacher is going to show you a demonstration using jars of water. Make observations about the demonstration using Steps 5a–5d.
- Draw a picture in your technology notebook of the setup before your teacher does the demonstration. Be sure to use labels to help you remember the details of the setup.
- Watch your teacher’s demonstration.
- Draw a picture of the jars after the demonstration. Add labels to your picture.
- Write your observations about what happened.
In The Water Cycle, you read that water moves because of thermal energy, or heat. Describe how the results of the demonstration relate to thermal energy.
Draw a two-column chart in your technology notebook. Label the first column “similarities” and the second column “differences.”
Remind yourself of the investigation you did using the convection box in the Explore activity. You may want to look back at the steps of that activity. Then, fill in the two-column chart to compare the demonstration your teacher did to the work you did using the convection box.
So far in this activity, you have been thinking about the movements of water and how they cause weather. You just thought about similarities and differences between an investigation with water and one with air. Write your ideas about why the air in the convection box moved the way it did. Hint
Read Air, Sun, Energy, and Wind to help you understand why the air moved the way it did. As you read, make notes of the information you could add to your ideas in Step 9.
Air, Sun, Energy, and Wind
There is air all around us. What we call air is made up of several gases. These gases are nitrogen, which makes up most of the air, oxygen, carbon dioxide, water vapor, and some others. Together, they behave like a single gas. In fact, our atmosphere is made up of these gases that act together as one gas.
To understand why gas moves, we need some information. Think about this experiment. (Your teacher may have you do this in class, or you can try it at home.) Make a tall stack of pillows. The pillow at the bottom has the weight of all the other pillows on top of it. It will become compressed because of the weight of the other pillows. The pillow on top will stay fluffed because there are no other pillows pressing down on it.
Air acts in the same way, because air has weight too. Air that is close to Earth has a lot of other air pressing down on it—all the air above it in the atmosphere! All that air creates pressure, and the gas particles near Earth are forced close together because of the pressure. Higher up in the atmosphere, there is less pressure on the gas particles. The gas particles still have weight high in the atmosphere, but there is less pressure on them. Imagine you had a small box. Near Earth, there would be more gas particles in the box than there would be high in the atmosphere, because the air pressure near Earth forces the gas particles closer together than the air pressure in the high atmosphere.
One way to describe the effect of pressure on particle distribution is the word density. Density is an object’s mass divided by its volume. Your box is the same volume whether it is near Earth or high in the atmosphere. Near Earth, however, there are more gas particles and hence the air is denser, which means that it has more mass. How does this help us understand why gases move? Both gases and liquids move from areas with a higher density to areas with a lower density. So they move from places with a high concentration of particles to places with a low concentration of particles.
We need additional information to understand why gas moves. The gases in air are composed of molecules, which are always in motion. The molecules in warm air are farther apart because the heat energy causes them to move around faster and spread out. This molecular motion affects the density of the air because there is less mass, or air, in a specific volume of warm air than there would be in the same volume of cool air. Thus, the density of warm air is less than the density of cool air. You may have heard the saying, “Warm air rises and cool air sinks.” Because the density of cool air is greater than the density of warm air, this statement is correct. Hint
At this point, you may wonder why the box in the Explore activity is called a convection box. Convection is the motion of a gas or a liquid in which the warmer portion rises and the colder portion sinks. This motion creates a circular pattern of motion. You can see this circular pattern in the convection box in figure 1-8. Convection occurs on Earth as well. You feel this moving air as wind. The type of circulation or movement shown in figure 1-8 is a convection cell. When air moves in a convection cell, you can feel it. For example, when cold winds in the Northern Hemisphere rush from the north to the south, those winds are part of a convection cell. In fact, one definition of wind is “air moving horizontally in a convection cell.” Wind is one way that moving air can affect weather patterns.
 Figure 1-8: Air particles in a convection box.
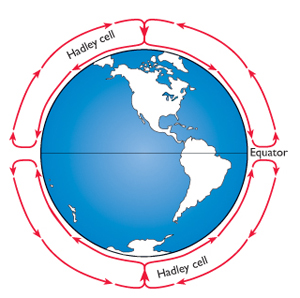 Figure 1-9: George Hadley was an 18th-century scientist who proposed this model. He envisioned convection cells that covered Earth like bowls.
How does convection happen on Earth? In the atmosphere, the energy from the Sun warms water on Earth’s surface and warms the air. However, the Sun’s energy is not absorbed equally all over Earth’s surface. This is in part because Earth’s surface is covered with land as well as with water. Solid materials absorb heat differently than the way water does. Also, the Sun’s rays strike Earth more directly at the equator than at the poles. As a result, the air in some places is warmer than in others. The energy in the warm air causes the particles to move around faster, and hence the density of warm air is lower than the density of cool air. This is why warm air rises.
Near the equator, the Sun’s rays strike Earth’s surface at right angles. Near the poles, the Sun’s rays are more parallel to Earth’s surface. Because of this difference, more heat develops over a square meter at the equator than over a square meter at the poles. In the early 1700s, George Hadley, a British scientist, studied this phenomenon and reasoned that these conditions should generate a very large convection cell. Such a convection cell would have warm air rising at the equator. The denser cold air at the surface of Earth would move from the poles toward the equator. (See figure 1-9.) This circulation pattern would distribute the warmer air to the higher latitudes and the cooler air to the lower latitudes. However, this simple model left many questions unanswered. Most notably, the model did not describe winds that move in an east-west direction.
The Hadley model was also unable to deal with the complexities of the circulation pattern. The winds near the surface of Earth can behave in complicated ways (See figure 1-10.) due to friction with Earth’s surface and the lifting of air over mountain ranges. Also, the heating of Earth’s surface varies over land and water, and evaporation and condensation occur in many places at different times all over Earth. Because of these complexities, we know that air pressure is always changing.
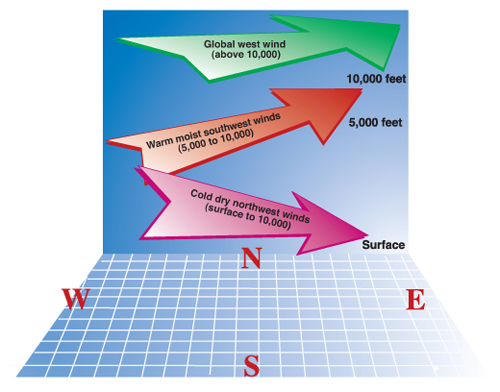 Figure 1-10: Three types of wind coming from three directions at different elevations. A low-level, or surface, wind is blowing from the northwest, a mid-level wind is blowing from the southwest, and a high-level (global) wind is blowing from the west.
Look back at your ideas in Step 9. Using a different-colored pen or pencil, add any new ideas that you have.
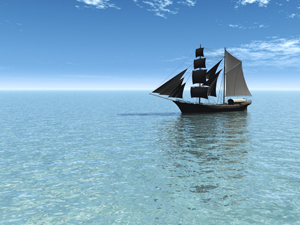
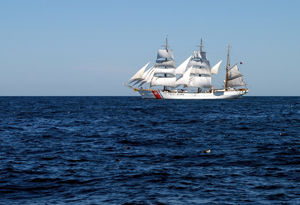
As you have learned, wind is the movement of air in the atmosphere. If you are interested in learning more about how wind (or the lack of wind) affects ships sailing in some parts of the world, read the sidebar Sailing in the Doldrums. As you read, answer the following questions:
- What is an example of a technology used in historical sailing ships?
- What was the problem with that technology?
- What is an example of a technology used in modern sailing ships to help overcome the problem? Sidebar
Activity Overview
In the Engage and Explore activities, students conducted investigations about the movements of water and air in the atmosphere. Those investigations should have provided an opportunity for students to recognize patterns. In the Explain activity, Weather and the Movements of Water and Air in the Atmosphere, students will read information to help them develop a better understanding of the science that explains the movements of air and water. In addition, they will build on their understanding of why these movements are fundamental to our weather.
Before You Teach
Background Information
If your students have already learned about the particle nature of matter, it may be easier for them to follow the discussion about air pressure, density, and temperature effects. However, even if students have not had this content previously, they can still benefit from this Explain lesson. In this case, you can focus more on the patterns of air movements.
In the student reading, it is stated that land and water absorb heat from sunlight but that they do not absorb it equally. This is because, on the one hand, the Sun’s heat penetrates water and distributes it over a depth of several meters. On the other hand, the Sun heats rocks and soil more intensely because most of the heat penetrates only a few centimeters. Typically, breezes form along a coastal area because of the different rates of heating between land and water. The land heats more quickly, causing offshore breezes during the day. Then at night, cool breezes move in off the water. The unequal heating of land and water is one of the major causes of wind movements across the globe. If you live near a coastline, have students express their awareness of the direction in which sea breezes move.
Materials
For each student:
pens or pencils of different colors
For the demonstration:
4 pint-sized jars with equal-sized mouths
1 L of warm water in a thermos (2 jars’ worth)
1 L of extremely cold (1–3°C) water in a thermos (2 jars’ worth)
2 index cards, large enough to cover the jars’ mouths (e.g., 4 × 6 in.), laminated
1 bottle of red food coloring
1 dishpan (for holding the jars during the demonstration)
Advance Preparation
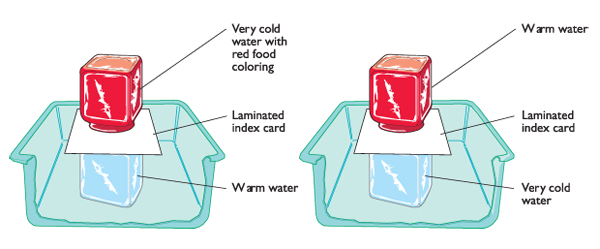
Find index cards that are large enough to cover the mouths of the jars and laminate them. Practice the demonstration in advance. You will need extra water when you practice. Do the demonstration using the following steps.
Put the warm water into 2 of the jars and the extremely cold water into the other 2 jars. Fill the jars full.
Put several drops of red food coloring into 1 of the jars of warm water and 1 of the jars of cold water.
Cover each jar of colored water with a laminated index card.
Place the jar of warm, clear water in the dishpan.
Hold the index card in place, tip over the jar of cold, colored water and place it on top of the jar of warm, clear water.
When you do the demonstration, make sure students are aware of the temperature of the water in each jar. You should also inform them that they are to make observations about the water when you pull the card out from between the jars.
Repeat the same procedure, placing the jar of warm, colored water on top of the jar of cold, clear water. (See figure T1-3.)
As You Teach
Outcomes and Indicators of Success
By the end of this activity, students will demonstrate their understanding of how the movements of water and air cause changes in weather patterns.
They will show their understanding by
contributing ideas in the discussion
providing examples of when they have seen water condense or evaporate
using the terms water cycle, condensation, and evaporation appropriately
comparing the movements of air in the convection box to the movements of winds on Earth
explaining that cool air sinks and warm air rises because of differences in density.
Strategies
Getting Started
Have students look at the chapter organizer. They should see the linking question that helps them make the connection between the Explore activity and this activity, although they will not be able to answer the question until they complete this activity. They should also see the key idea of this activity.
Process and Procedure
Have students write down the focus question in their technology notebooks (“How do the movements of water and air cause changes in the weather?”). They should draw a box around the question. Then, they should answer the question using their best ideas. Many will not have many ideas at this point. Let them know that they will have an opportunity to revisit the question later in the activity when they have learned more about the concept.
Allow time for students to read The Water Cycle. Encourage them to write down any unfamiliar words in the glossary of their technology notebooks along with their ideas about each word’s meaning. They can discuss their thoughts about the definitions with their teammates or with you.
Remind students of the demonstration using the glass containers. Then, have them answer the questions in Steps 3a–3c.
How did that demonstration represent the water cycle? Use the words condensation and evaporation in your answer.
Students’ answers will vary, but they should now understand that water evaporated in both the covered and uncovered glass containers. In the uncovered glass container, the water evaporated and became water vapor in the air. In the covered glass container, the water vapor could not escape because of the plastic wrap. They should also be able to explain that condensation was greater on the side away from the light because that side of the container was cooler.
If you allowed the water that accumulates on the sides of the glass container to drip back into the water below, the process would keep going as long as there was heat from the lamp. This would create a water cycle inside the glass container. This represents the water cycle because water evaporates at the water’s surface and condenses on the side of the container. From the side of the container, the water can drip back down or evaporate again.
In the glass container demonstration, where is energy absorbed by water? Explain your answer.
In the glass container experiment, energy is absorbed by water during evaporation. Evaporation occurs whenever water sits in the open air. Sometimes we can see this when wet ground or a lake appears to “steam.” Energy is being absorbed. Although students cannot see evaporation during the glass container demonstration, they should understand that it is occurring at the surface of the liquid and that energy allows water vapor to go into the air.
In the glass container demonstration, where is energy released by water? Explain your answer.
In the glass container demonstration, energy is released by condensation. Condensation would have to occur to make raindrops in the atmosphere. Students should recall from the demonstration that drops of water formed on the plastic and on the sides of the glass container.
Allow students time to draw their pictures. You may allow them to use colored pens or pencils for drawing, but remind them that the point of this exercise is to show what happens to make the fog, rather than trying to make a “pretty” picture. Students should show that water evaporates from the water around the city and that it later condenses to form the fog. Help them realize that the water does not go straight from the bodies of water into the fog or clouds. This is a common misconception among students, and it is important for them to realize that there is water vapor in the air at all times. Depending on their understanding, you might wish to have your students label where energy is absorbed and released.
Conduct the demonstration using the jars of water. (See the instructions in the Advance Preparation section, and refer to figure T1-3.) Allow time for students to make drawings of each setup and record their observations in their technology notebooks. Make it clear to them which water is warm and which is cold. From the demonstration, students should see that mixing is greater when the cold water is on top. Less mixing occurs when the warm water is on top. At this stage, they may not be able to explain why this occurs. They will learn more by reading Air, Sun, Energy, and Wind in Step 10.
Students should think back to what they read about in Step 2. You may need to help them think about what occurs when particles are closer together and not moving much versus when particles are farther apart and moving more. When the cold water is on the bottom, the particles are packed closer together, so the warm water on top does not mix much with the colder water on the bottom.
Give students time to draw their two-column tables in their technology notebooks.
Have students compare the similarities and differences between the convection box investigation in the Explore activity and the demonstration using the jars of water in this activity. Students should recognize that during the convection box investigation, air moved upward above the candle (where it was warmest). Air moving downward was cooler (through the tube on the side without the candle).
Students’ discussions about why the air and water moved the way they did provides an opportunity for assessment about where students are in their understanding about energy and density.
Have students read Air, Sun, Energy, and Wind. Remind them that they have been thinking about how water moves, and it is time to think about how air moves. Have them answer the question in the hint as they read.
Have students revise their answer using a different-colored pen or pencil. Many students may be resistant to revising, especially if they had some correct ideas in the beginning. Remind them that the goal is to have the most correct answer they can with all the information they can include. If they feel the answer they wrote during Step 9 is very inaccurate, you might offer them an opportunity to write a new answer.
The sidebar, Sailing in the Doldrums, is an optional reading that can help students understand a practical effect of a lack of air movements. It also provides a link to technology related to the weather. If you wish to have students read the sidebar, be sure they consider the questions listed in Step 12.
In this activity’s demonstration, students saw that cold water moved downward and warm water moved upward. At this stage, they will not be able to explain why movements are happening in this way, but they can recognize the pattern of warm water or air rising and cool water or air sinking.