


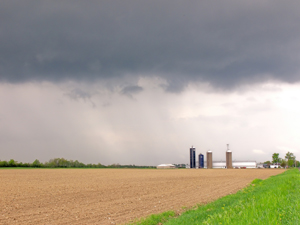
Have you ever been soaked in a rainstorm or surprised by a thunderstorm? If so, you know that water is a big part of the weather. Rain, snow, hail, sleet, and fog are all examples of weather events that involve water. What determines whether it is a dry day or a rainy day or a snowy day (see figure 1-2)?
In this Engage activity, Water on the Move, you will think about how water is all around you, even when you cannot see it or feel it. As you work through this chapter, what evidence can you find that water is on the move? Materials
-
Set up your technology notebook for a new activity. Remember to include the title of the activity and the date. Add this information to your table of contents.
-
Obtain the materials that your team will need for the investigation. Hint
-
Fill the can about halfway with room temperature water. Hint
-
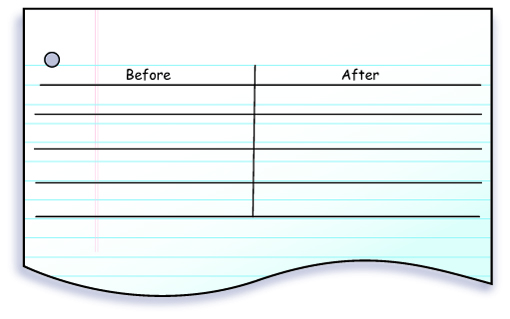
Draw a chart in your technology notebook like the one below. You can use this chart to record your observations.
-
Observe how the can looks and feels on the outside. Record your observations in the “before” column in your chart.
-
Add 3 ice cubes to the can.
-
Stir the water and ice slowly for 3 minutes. Do not hold the outside of the can while stirring.
-
Look at the can and touch the outside. Record your observations in the “after” column in your chart.
-
Empty the can and dry it off. Then return the materials to where you got them.
-
Observe the containers that your teacher has set up for the class. In your technology notebook, draw pictures of the fishbowls. Use labels to help you remember all the parts of the setup. Write a description of your observations. Hint
Activity Overview
The Engage activity, Water on the Move, involves two parts. In one part, students will conduct their own investigation to begin thinking about water in the atmosphere. The second part of the activity is a demonstration. Through the demonstration setup, students will continue to think about the movements of water in different forms in the atmosphere.
Before You Teach
Materials
For the entire class:
- 2 large glass containers (for example, fishbowls)
- 1 sheet of plastic wrap (large enough to cover 1 glass container)
- 1 large rubber band
- a supply of water
- 1 bottle of food coloring
- 1 desk lamp with a 60 or 75 W light bulb
- clock with a second hand that is visible to all students
For each class of 30 students, teams of 3:
- water at room temperature (approximately 2 L total for class)
- 10 empty soup cans with labels removed
- 10 stirring sticks
- 1 bag of ice (5 lb) or 40 ice cubes
- 1 cooler for storing the ice (optional)
- 10 paper towels
Advance Preparation
Fill 2 fishbowls or other large, curved-glass containers about one-third full of water. Add a few drops of food coloring. Cover 1 container with plastic wrap and use a large rubber band to tighten the seal. Set up the covered glass container near a desk lamp and turn the lamp on at least 2 hours before class. (In our setup at BSCS, we used a desk lamp with a 75 W light bulb, and we set the glass container about 5 cm away from the lamp. If you use a variation, test it first.)
Collect soup cans and remove the paper labels. Make or purchase enough ice so that each team can have 3 or 4 cubes. If you do not have a freezer handy, bring in a cooler in which to store the ice. Early in the day, set out 2 L of water per class so that the water reaches room temperature by the time you need to use it.
 Cautions
Never place the lamp closer to the glass container than 4 cm. Doing so may cause the plastic wrap to melt. Also, make sure the lamp is positioned so that the cord does not create a tripping hazard. If the stirring sticks you provide are made of glass, advise students to be careful with them.
As You Teach
Outcomes and Indicators of Success
By the end of this activity, students will
-
become aware of an example of water movements within the atmosphere by using an example of condensation.
They will demonstrate their awareness by
- describing the thin layer of moisture (water film) that forms on the soup can
- recording their descriptions of the water film
- comparing the results of the soup can investigation with the result of a class demonstration.
-
begin connecting their knowledge about water movements to weather phenomena.
They will show their understanding by describing how the processes in the hands-on investigation are similar to processes that occur in nature as weather.
Strategies
Getting Started
Begin by having students read the chapter overview and the goals of the chapter. Go over the chapter organizer with them. They should read the key ideas of the activities and the linking questions. Note that the linking questions help them understand the connections between one activity and the next, but that they will not be able to answer a given linking question until they complete the activity that follows the question. Then, have them read the introduction to the Engage activity before beginning the investigation.
Process and Procedure
If necessary, remind students how to set up a new page in their technology notebooks. They should include the title of the activity and the date. They should also add this information to the table of contents in the front of their technology notebooks.
Have students work in teams of three for the investigation. The hint provides suggestions on how teams can practice their teamwork skills and share the responsibility for conducting the investigation.
Ask students to read all the steps in Process and Procedure before beginning the investigation. Allow them to ask questions about the procedure and make sure that they know where to obtain the supplies before beginning. Explain that they should conduct the investigation with the can before viewing the demonstration.
Students should create a chart in their technology notebooks for recording their observations.
- Students continue the
investigation and record their observations. Make sure they
understand when to record observations in the “before”
column and when to record them in the “after” column. They
also need to clean their space and return all materials to the
proper location.
Students in all but the driest climates should see a film of water form on the outside of the can.
Note: In this Engage activity, students may not know that evaporation and condensation are the terms used to describe what they are observing in the investigation and the demonstration (see Step 10). Do not introduce these terms now. If students refer to either evaporation or condensation, make sure they understand the meaning of the word.
Allow time for students to observe the demonstration that you have set up with the two glass containers (see Advance Preparation). Explain to students that they should not touch or move the glass containers. Students should draw and label pictures and write a description of what they see in their technology notebooks. The hint asks them to look for differences both between containers and within a given container.
Students should see condensation on the sides of the container covered with plastic. In addition, in the covered container, they will probably see less condensation on the side closer to the light bulb because that side of the container is warmer—the amount of condensation is probably greater on the side farther from the light bulb because the glass is cooler. Students should try to explain why these differences occurred.
If you want to continue to explore this phenomenon over the next few days, try variations such as shutting off the lamp, moving the lamp farther away, and so on. The humidity inside the glass containers still should be high enough to maintain condensation.